Share This
With all our PERRIN customers, we consider all our maps to be Custom maps, because each map is tailored to each car. With our ALTA customers, all our maps are preloaded onto the Mini AccessPORTs so normally there is no need to go through these extra steps. There are cases where we feel it requires something beyond the supplied maps or when we are trying to fix a problem, which will require you to follow the below instructions. In all "Custom Map" cases, we will email you a special version of the map that will need to be loaded onto the AccessPORT. Below are some instructions to help walk you through the steps necessary to load and install your map.
How-To Load Custom Maps
- The AP Manager is a program that not only updates your AP, but also it allows you to manage all your maps for your AccessPORT.
- After its installed, open the AP Manager program and plug your AccessPORT into the computer, and verify the software connects to your AccessPORT. If it doesn't automatically do this, click the connect button at the top of the program.
- Check to see if your AccessPORT needs to be updated. If it does, update the AccessPORT before loading the new custom map.
- Open up your email program and the message with attached map. The best way to save the map from your email program is to "Save As" and if the option comes up to select file type, choose "All File Types". This ensures that the file gets saved properly and will work on your AP. For ease of installation, it is best to save the map on your PC's Desktop. If you can't find the email, check your JUNK folder.
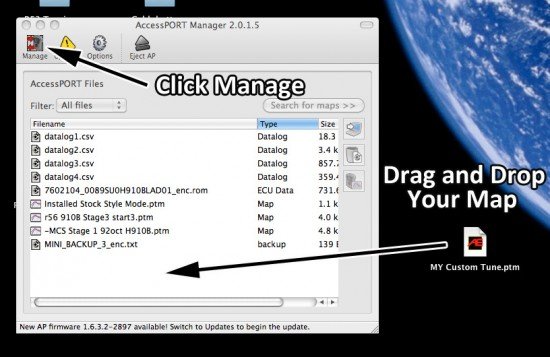
- Open the AP Manager Program, and click on the "Manage" button. You may see some other maps, or data logs, or other files as shown below.
- The simplest way to get the map from your computer is to drag and drop it into the AP Manager program. An example is shown below where the custom file was previously saved to the desktop.
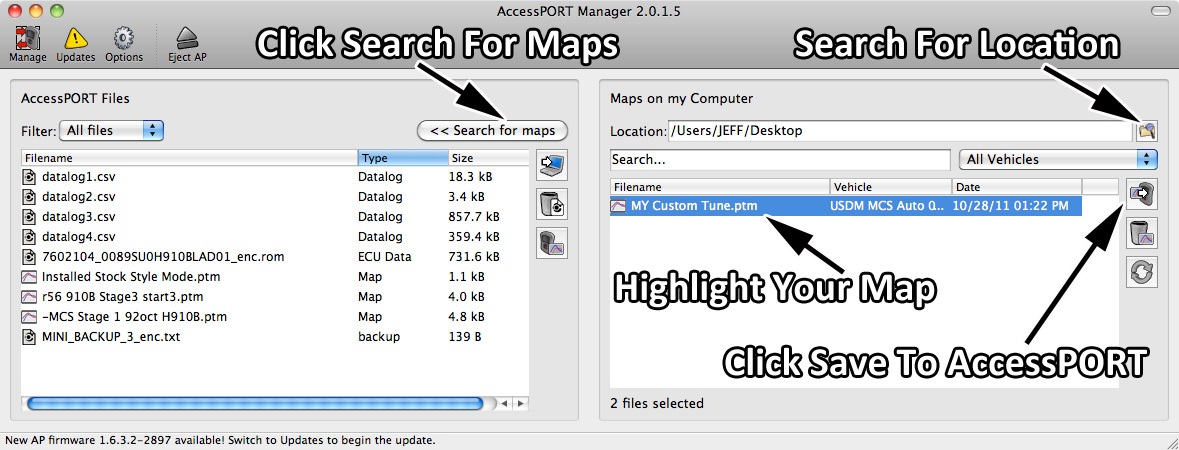
- Another method is to click on the "Search For Maps" button, which brings up a window on the right. In this window, click the "Search For Location" button and locate your map.
- Once your map appears in the lower box, highlight the map, and click the "Save to AccessPORT" button. Your map will now show up in the left side of the AP Manager indicating its now on your AccessPORT.
- If you choose to, now is a good time to delete maps that you may not use. For instance, if you live where there is only 91 octane, you can delete all the 92 octane maps. Or if your car is a Stage 1, you can get rid of the other stages. This makes it a little easier to find your map while loading them onto your car.
- After your map is loaded onto the AccessPORT, disconnect it from software by clicking on the EJECT button in the AccessPORT manager program. Now you can physically remove the AccessPORT from your PC.
- With AccessPORT loaded with custom map, you are now ready to plug it into vehicle and reflash it.
- Locate the OBD port on your vehicle and plug the AccessPORT OBD cable into it. Plug smaller black rectangle connector into AccessPORT itself. (If you have an 02-07 WRX/STI, you will need to connect the test connectors under the dash as well. Refer to your AccessPORT manual if you are unsure of where these are.)
- Place key into the ignition and turn to the ON position (do not start engine). Make sure that the radio, lights, Heater/AC controls and all accessories are turned off and battery is fully charged before flashing ECU. For MINI Cooper Customers, a good indicator that the car is on, is to look at the gas gauge. If the gas gauge is illuminated and working then the key is in the "On" position.
- Press the up or down buttons and scroll to the "Tune" menu and click OK. (For Subaru Customers its important to choose "Reflash", not "Real-Time Flash" after clicking OK at the "Tune" Menu)
- Highlight "Change Map", and click OK.
- Scroll up and down to highlight your custom map, and click OK.
- The installation process will begin and when the AccessPORT is done installing your custom map, turn key to the off position, disconnect the AccessPORT from the OBD port.
- Turn key to the on position, and wait for 5 seconds for the ECU to reboot. Then start the car and enjoy the new found power!
If you have any questions, or need additional help with installing your custom map, please send an email or use our Live Chat Option on website.


