
Share This
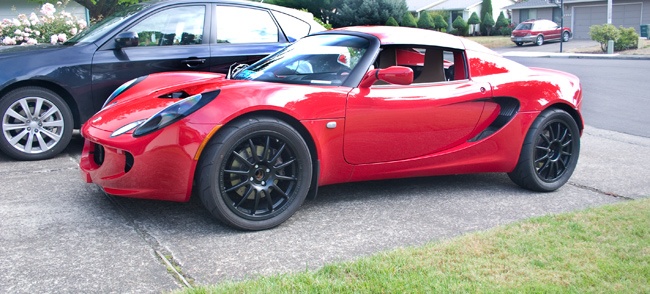
First let's start with the car. I am not going to get into the stats of the car in stock form. Its by no means is it the fastest car, or the highest G load car, but it does everything pretty well, especially handling and feel. I have owned it for almost 2 years now and has been up for sale 2 times, but never sold. Mainly because I didn't really want to get rid of it! Well I decided to sell to the STI as the new model was coming out, and there wasn't much let to modify on it.
So I started looking at the little red car in the garage. Over the years, my wife mainly drove it, and I put up with some of the little things I didn't like. There was really only 2 things I didn't like, the power or lack of power, and the placement of the pedals.
I am big guy, 6'4" and way more than 200lbs. So this little car isn't something that really fits my physic. When I was falling in love with the car, the only concern I had was can I fit. Believe it or not, there is plenty of head room for me. Leg room..... well its not perfect. But most cars I have owned (except the Mini) don't quite have enough leg room. Over the next few months, I started to tweak the pedals, closer to the floor to allow for more room. Well after some simple adjustments, it was nearly perfect! Nearly, as the clutch pedal wasn't really adjustable. I saw a way to adjust it, but I had to remove the clutch master cylinder and space it from the foot well. Sounds easy on a normal car, but on the Elise, it's a little tricky. The only way to get to it was to remove the front clamshell.
One thing I really found I love is how simple yet technical the car is. Things like the body panels, suspension, chassis, are so simple in their construction, but at the same time they are very technical in the way they are made and designed to work together. While removing the front clam might be easy and the clutch is something I want to adjust, I have Horsepower on the brain!
Like I said, it's a fast car, but it could use another 50-100HP, and it would be perfect. So, how to get 50-100HP?? There are supercharger kits and turbo kits available for the lotus, so which method?? Supercharger kits never really get me excited as they are expensive parts by them selves compared to turbos ($3000 vs. $1000) and they cost you HP to drive them. A SC kit requires a lot of off the shelf parts, where a turbo kit requires more custom parts, all of which are things I can build myself. Some argue a SC is more responsive, as they build instant boost. For a light car like this, a SC would be a very good, but expensive option. But, comparing an engine running the same boost, the turbo (when sized properly) can be just as responsive, and make more HP than a supercharger. While the high compression engine is controlling the limit on HP, it also helps to make a turbo spool up quicker. In the end, the right size turbo will build more boost at lower RPM than the SC, and it will not have the 20-30HP of drag on the engine. I think the obvious choice is the turbo.
Like I am going to buy someone else's kit, when I can make it myself!
TURBO KIT PLANNING
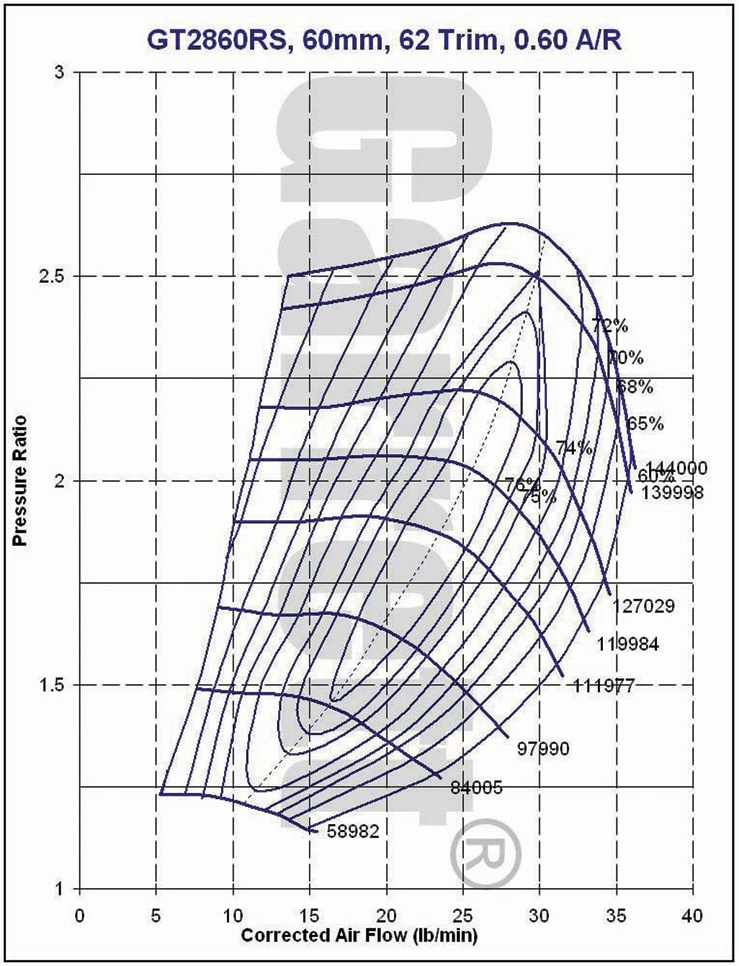
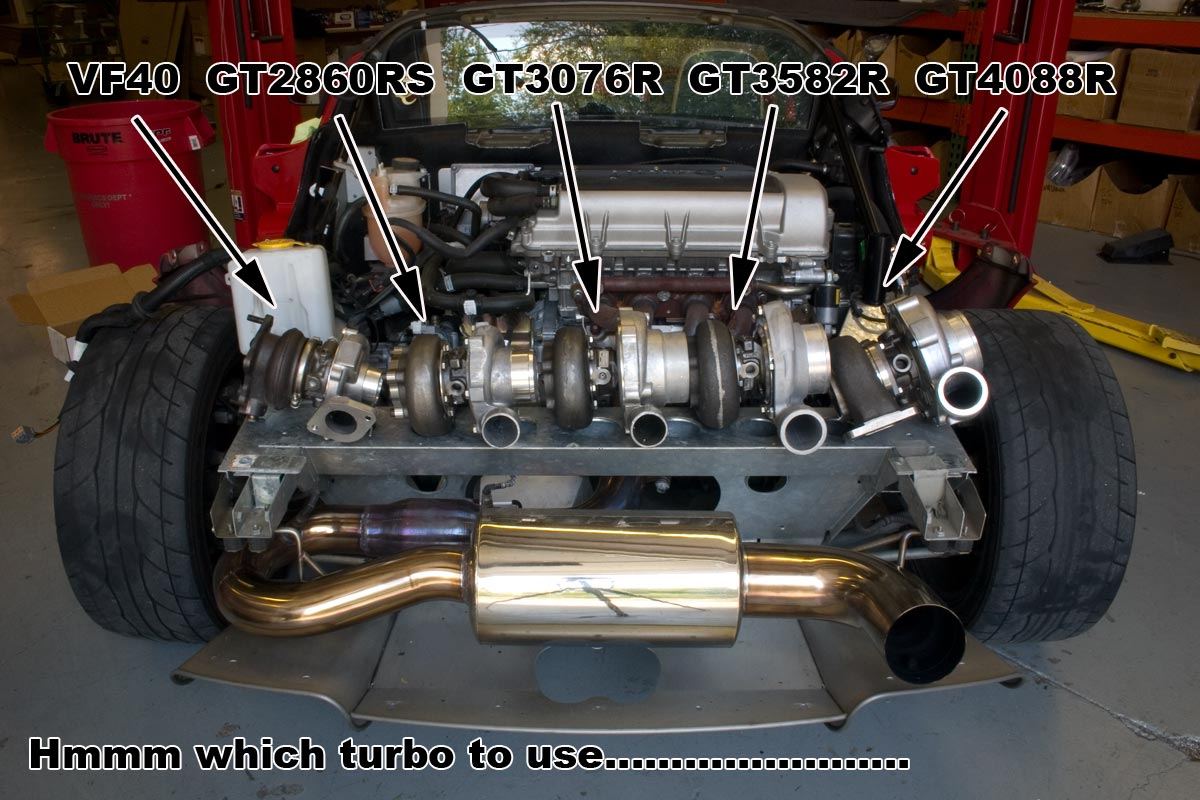
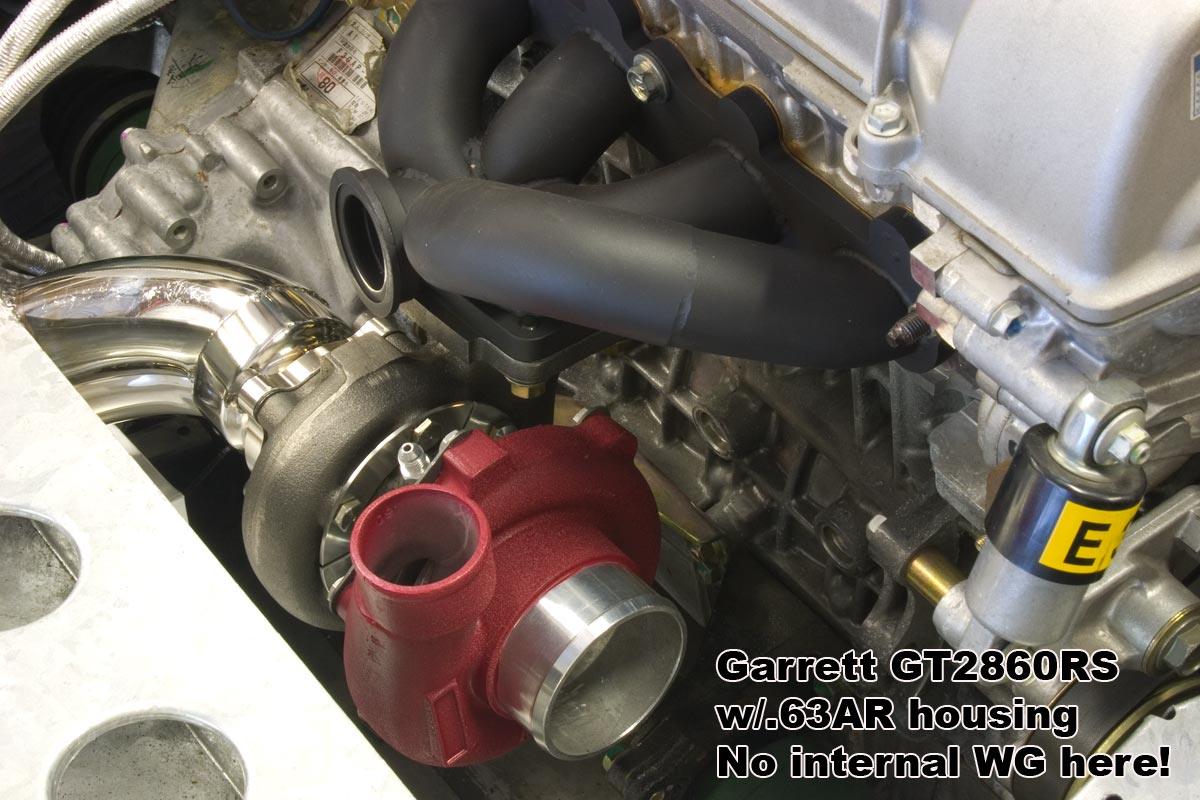
With my experience with turbos, and a few calculations of engine air flow at different boost levels and RPM, I mapped out a few Garrett compressor maps. There are about 3 turbos, or basic turbo sizes that I had a feeling would work well. The GT2554R seemed like a good turbo, as does the GT2560R, and GT2860R. The GT25 turbos will spool instantly, but the high reving, and high compression motor, needs to breathe! Both the GT25 turbos have a very small turbine wheel, and while these will make the power I want, they could cause high exhaust back pressure and cause an increase in EGT's. The GT2860R turbo might be a little laggy compared to the other smaller ones, it should still be responsive enough to build boost before 3500RPM. When the turbo will spool up is kind of a mystery until we can fire up the engine. Because I rarely drive the car below 3500RPM, the GT2860R is the turbo of choice, or is it?? There is another turbo Garrett makes that is very similar to the GT2860R, that is the GT2860RS (Disco Potato). The RS is rated for an extra 60HP, and is known by many to not be much less laggy than the R model, but make more power. The difference in the turbos is the trims of the compressor wheel and turbine wheel. The larger trims make the turbo flow more air, and be freer flowing. We just happen to have one of these sitting around the shop! Along with a few others: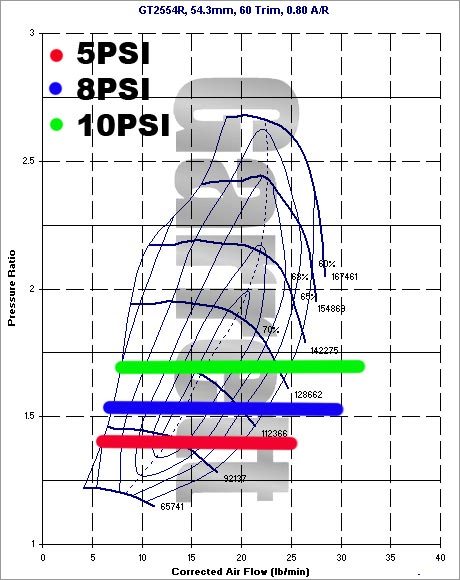

In reading about the turboed Elises out there, I see that some people have boost creep problems. All the turbo kits use internal wastegates with small ports for bleeding off exhaust pressure, which could be part of the boost creeping problems. So an external wastegate became part of the turbo kit equation. External Wastegates have very large ports to bleed off exhaust pressure, plus they look way cooler when installed! These are also parts we have sitting around the shop.
Engine Managment
In order to run the engine with the turbo kit, good engine management would be necessary. Again, reading about the other Elise turbo kits out there they all use crappy EM to run the car. Piggybacks, reflashes, all of which rely on someone else's tune. Not to mention are known for blowing up a few engines. This just doesn't cut it for me. So I turned to Hydra EMS, who I have used for 3 other project cars. They offer stand alone, plug and play ECUs for many cars one of which is the lotus.
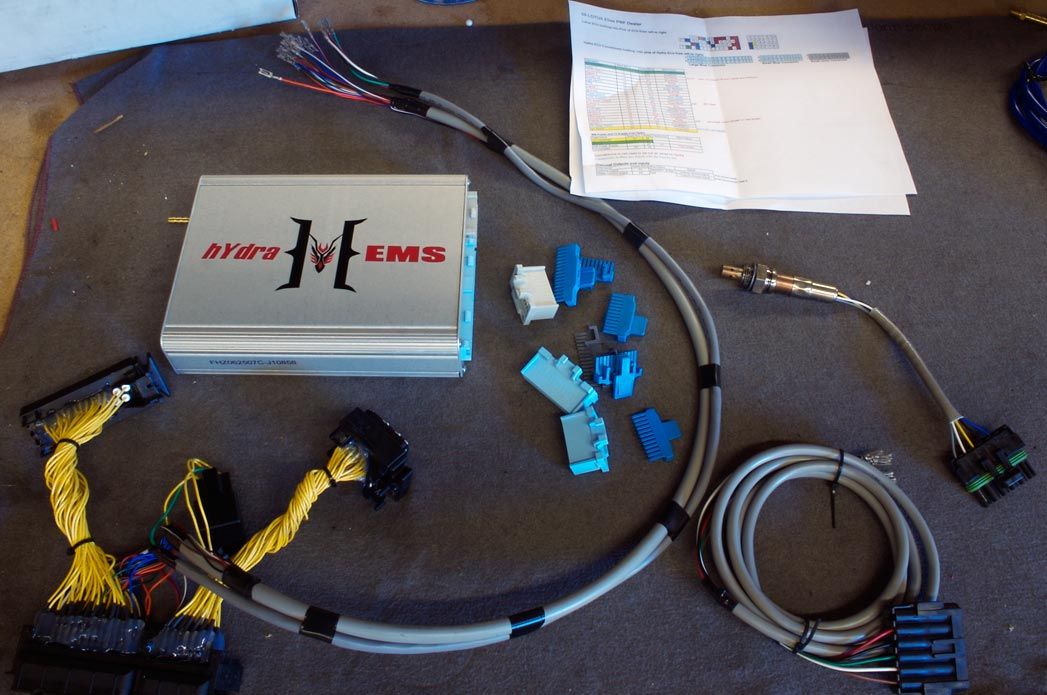
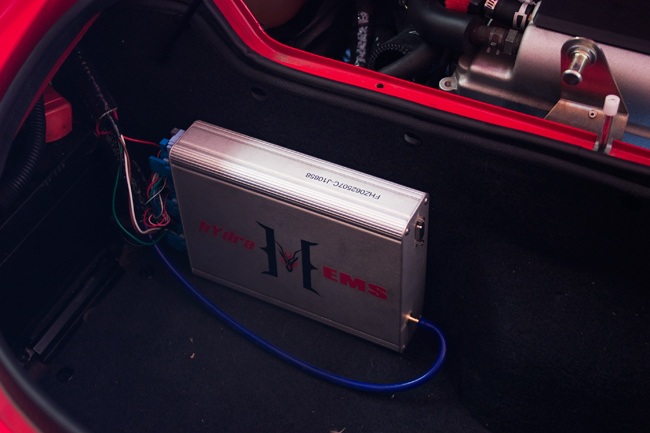
The HYDRA has to be installed in the trunk. This requires re-pining the harness, drilling a hole and running a vacuum hose. Not a big deal, just takes some time. Before I go installing the turbo kit, I installed the Hydra and got it running in NA mode. Tuning the Hydra is simple, and I bought the integral Wide band 02 sensor with it that allows logging to include the wide band and the auto tuning feature to work. While the wide band 02 sensor allows for the auto fuel tuning feature to work, its not good enough to get the car fully tuned. But it helps to get you close.
3" EXHAUST SYSTEM
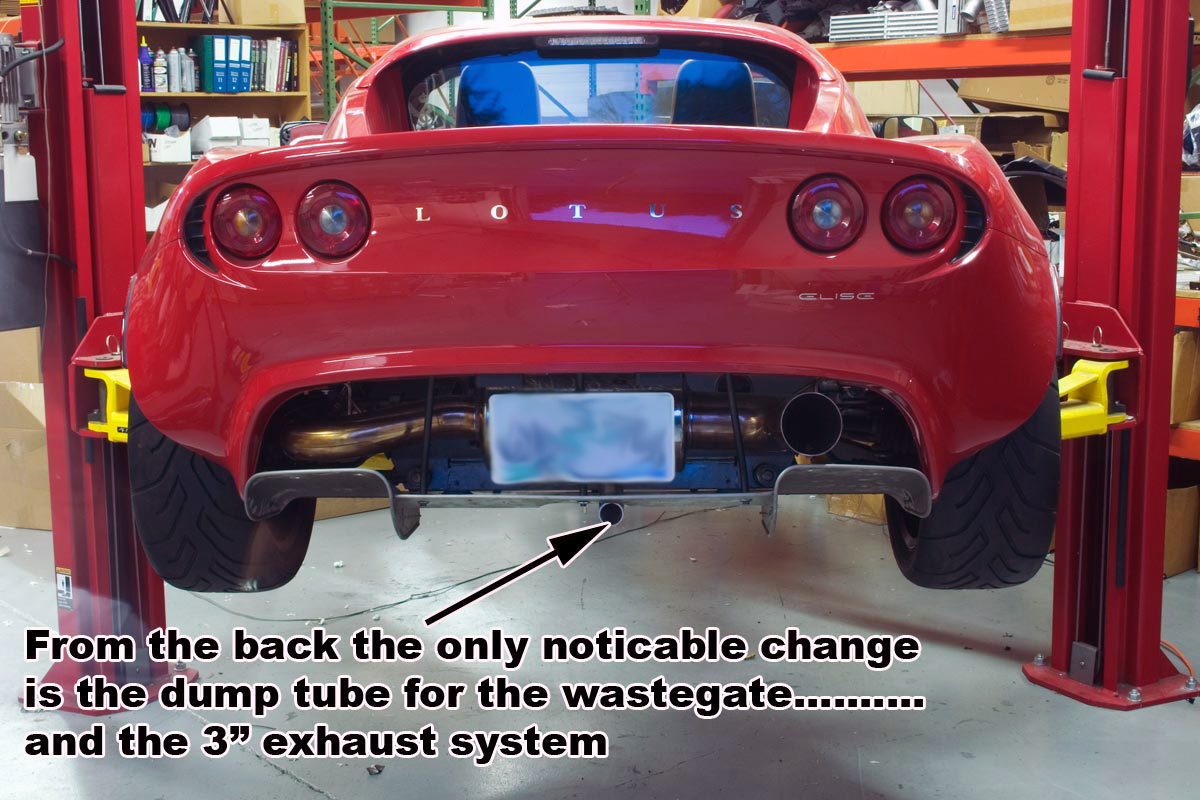
With any turbo system a good large diameter exhaust is needed. Before the turbo kit goes in, I built a 3" single muffler exhaust system. While a bit loud and large for the NA engine, the 3" exhaust, it would soon show its worth, when the turbo kit is all done. I used 3" 304SS tubing, and a straight through 3" round muffler. I had an old High flow metallic cat lying around which I also used to not only be emissions friendly, but to keep the sound somewhat in check. This header back exhaust design utilized the OEM flange with donut gasket, so it could bolt to the factory header. While this flange was a temporary until the turbo kit was done, it would serve as a good starting point for the turbos' exhaust system.
BUILD TIME
So I have the turbo, wastegate, tubing and the other basic components to start building the turbo kit. Now its time to pull the back of the car off to plan where its all going to go.
I looked everywhere on the net for some how-too's on removal of rear clam. They just don't exist. So no big deal, just means I will have more fun doing it. First step is removing the battery, battery harness, and tail light harness from the trunk. Once this is done, there are 4 screws that have to be removed that hold the rear clam to the chassis. Since I built a rear panel eliminator, there are only 3 other screws that have to be removed from inside the trunk.
From there the quick and basic steps are:
Remove the wheel well liners, remove the bolts holding the body to the rear diffuser, remove the seats, remove the plastic rear speaker shroud (careful of the speaker wires, and the proximity sensor, remove the 4 nuts holding the trunk lid pivots, remove trunk lid, remove the upper roll bar cover, remove screws holding body to roll bar, remove plastic roof latches from body/roll bar, remove 2 bolts on each side of body where the upper clam meets the lower body (2) on each side, Removing all the obvious bolts and screws are easy, but there are 2 hidden screws that are not easy to find. These are located behind the seat belt tensioners toward the outside of the car. All of these bolts are 10mm head bolts with large SS fender washers behind them. With the back of the car removed, I can now start figuring out where the turbo can go.

With the back of the car remove, the car looks kind of cool! Maybe i will leave it like that.....
Now being realistic!
While its no fun my wife had to go on a trip to China, and my step son vacationed at my dads house, it gave me 2 weeks to finish the turbo kit up! I already have the Hydra installed and running, so when I get the turbo kit done I can fire it up right away!
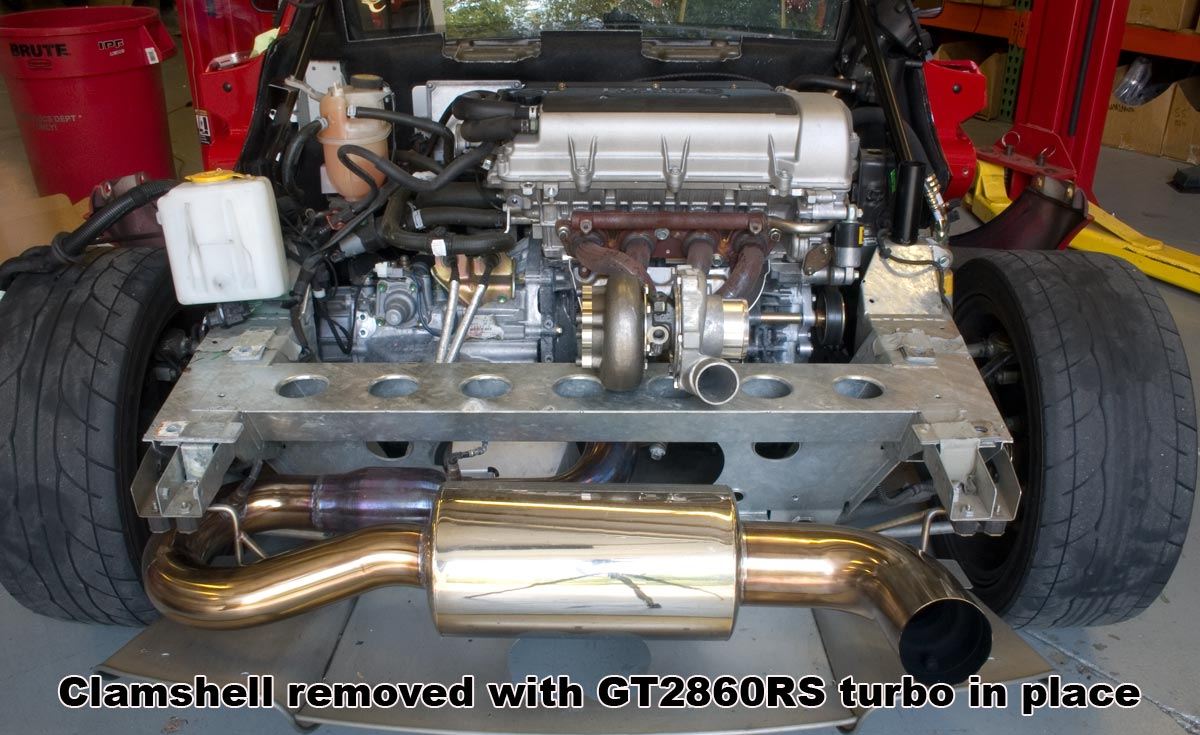
With the exhaust system built, Hydra installed, and rear of car removed, it was time to start planning where the turbo will go. I decided on using the GT2860RS with an external Wastegate. This turbo is very small and compact, and will be very easy to fit behind the engine. I purchased a ½" thick Laser cut flange for the head to start with, and bolted it to the engine. From there I used
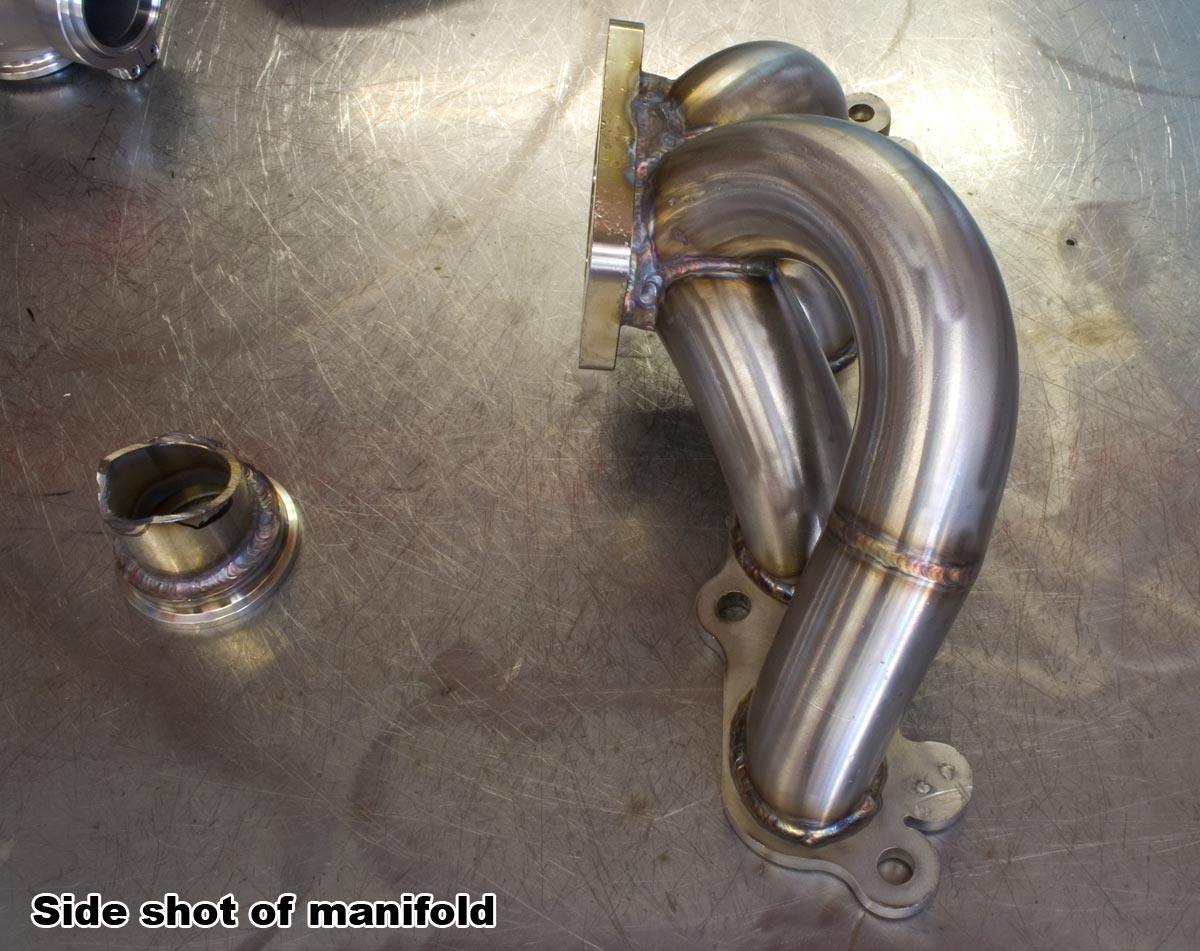
I had to reinstall the rear body a few times to make sure things cleared body and chassis parts. Once I got the turbo sittin' pretty, I built a little jig, by welding some 1/2" SS rod to the header flange and turbo flange. This allowed me to remove the "Header" from the car and start putting together the primaries.
Choosing the primary size was easy as the flange ports were 1.5", and this would be plenty big enough for the HP I would be running. To ensure it would hold up for a long time, I made sure it was .125" wall. This thickness ensures that vibration, and the weight of the turbo will have little effect on the durability. This thicker material is also good at heat retention so once heated up it will help keep exhaust velocity up.
With the jig off the car, and few days of working after work, I had the header completed.

To keep the part looking good, and to add some function I decided to ceramic coat it. I had used some VHT header coating in the past with great success, so I decided to use it once more. This coating is $8 a can and one can, will do the trick. The only important thing is the header has to be scuffed up a little to ensure the coating adheres to it properly.
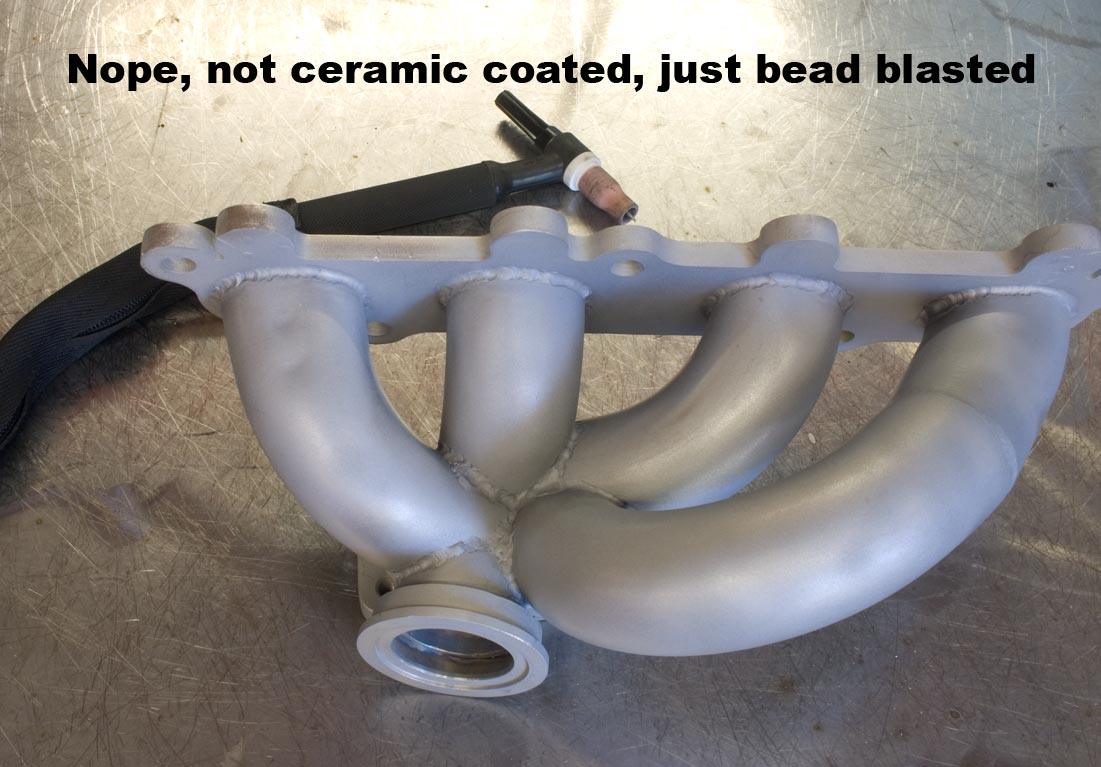
With the header nice and roughed up, it was time to coat it. The coating turned out great! The trick is to make sure you do a lot of light coats, while not going too thick, as this can cause it to crack after the initial heating process. I used the black colored coating as it is a very clean look. It was pretty barried in the engine bay, so I could care less about it being all shiny and polished.
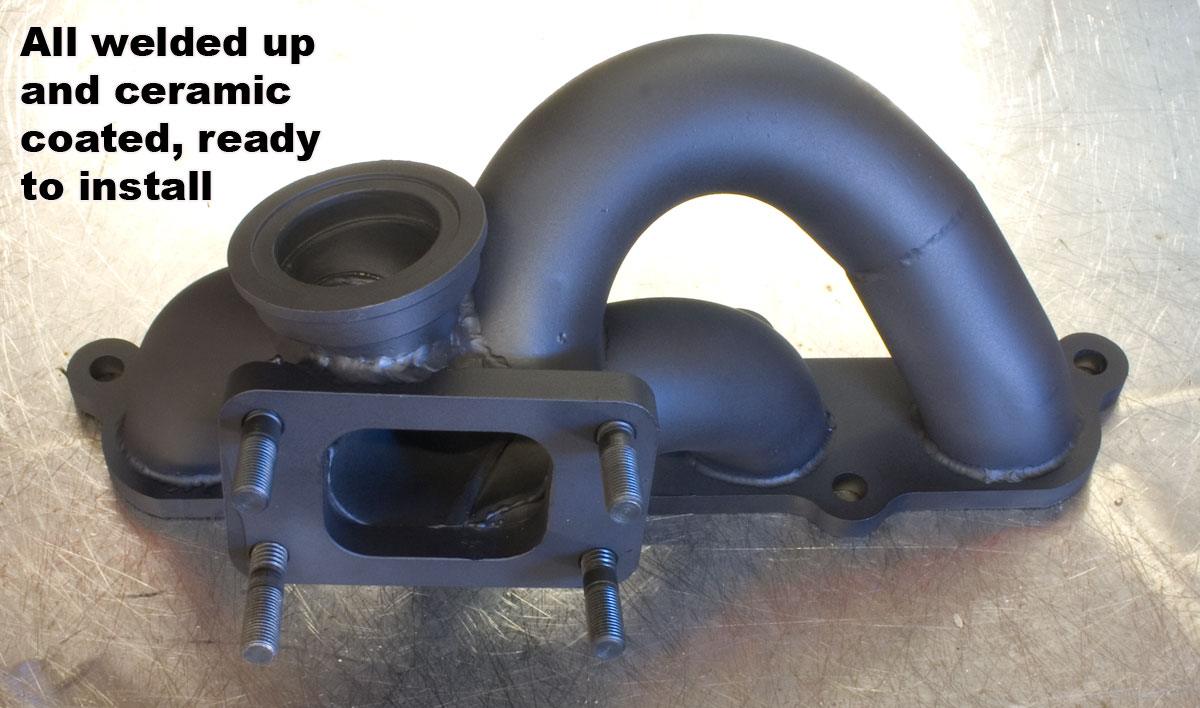


Upon completion of the header, I noticed the flange was not so flat anymore. I tried to make sure to not use too much heat while welding it together, but SS really likes to move when welded. To ensure it was not going to be a problem, I had it ground flat. Of course I didn't notice it until AFTER I coated the header, hence the black header with a shiny header flange.

While I was in the mood for painting things I decided to paint the compressor housing of the turbo. Again, turning to VHT for some more paint, I ended up buying a couple cans of wrinkle black and wrinkle red paint. This stuff is also awesome paint. I have used this on the H6 project, and on a couple other random things.
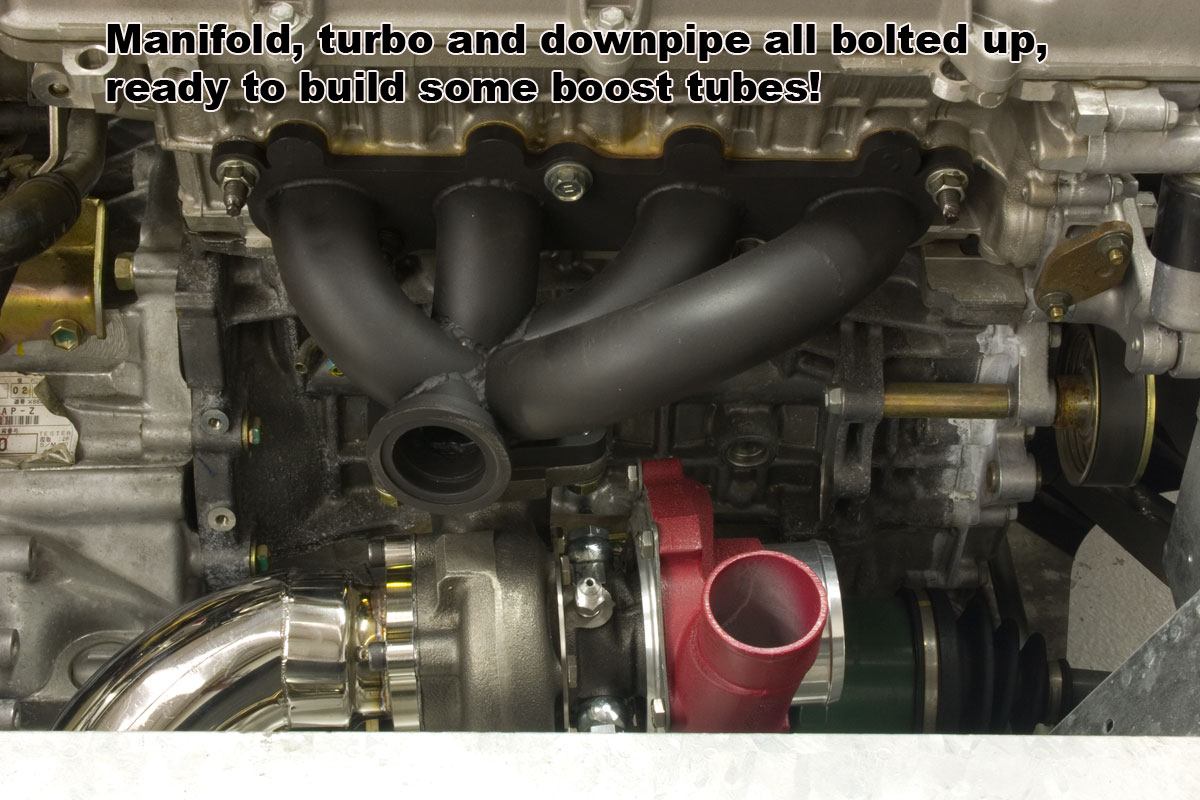
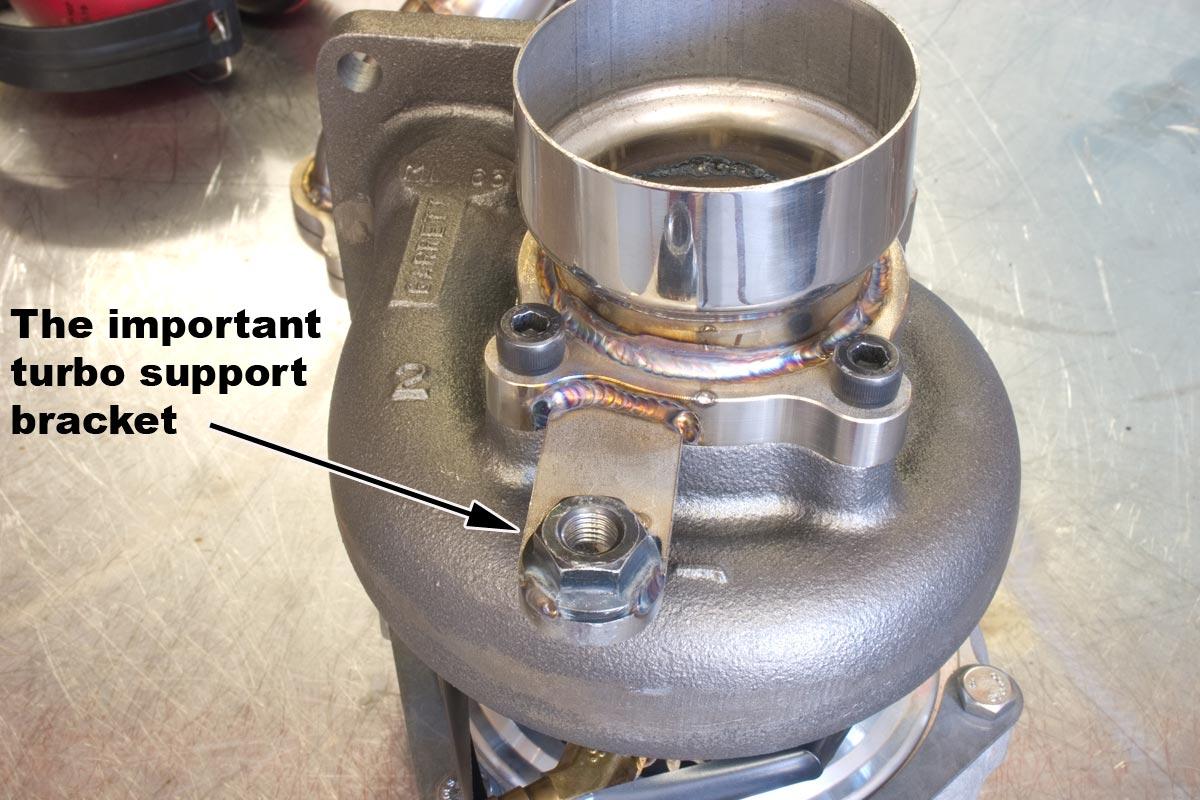
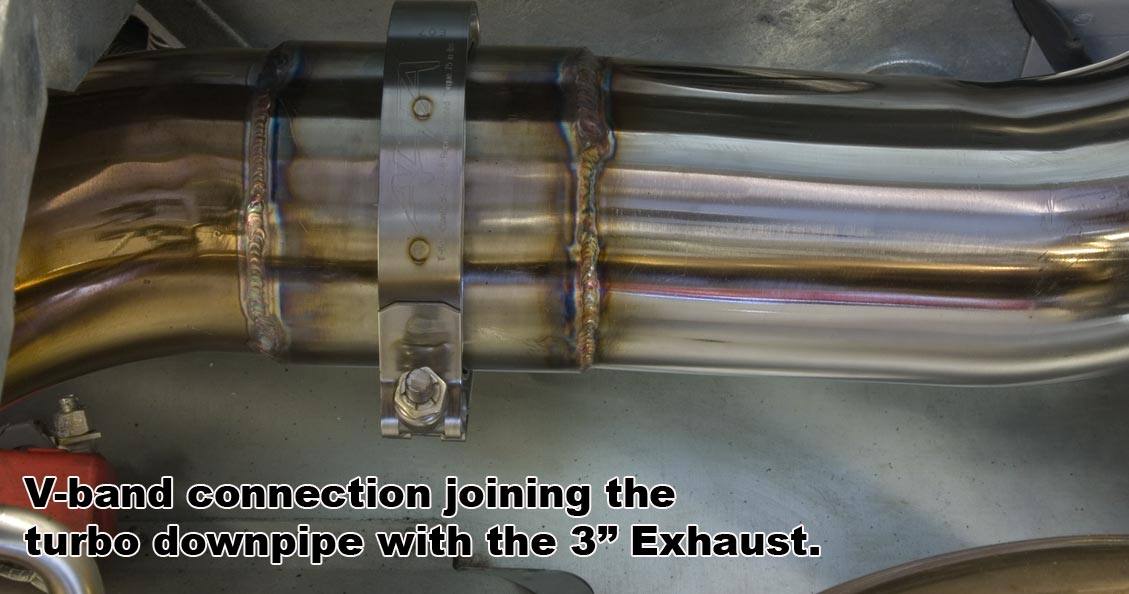
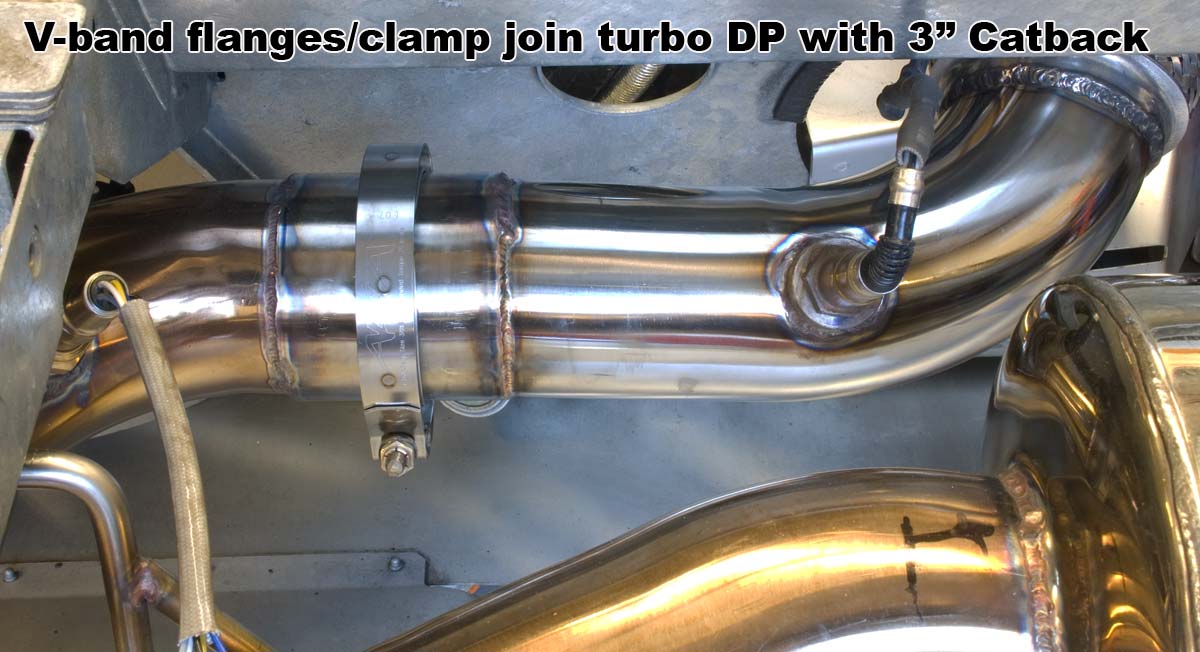
With the turbo mounted, it was time to adapt my exhaust to it. Toyota was nice and used a bracket to help support the OEM header, and I decided to utilize that to help support the turbo. It worked out perfect to build a bracket onto the flange for the turbine outlet. Next was getting from this flange to the exhaust I already created. Since I have to cut of the OEM donut flange off the exhaust, I had to replace this with a flex joint. From there it was easy, a V-band flange, some bends, and polish it all up, weld it together, and bam!
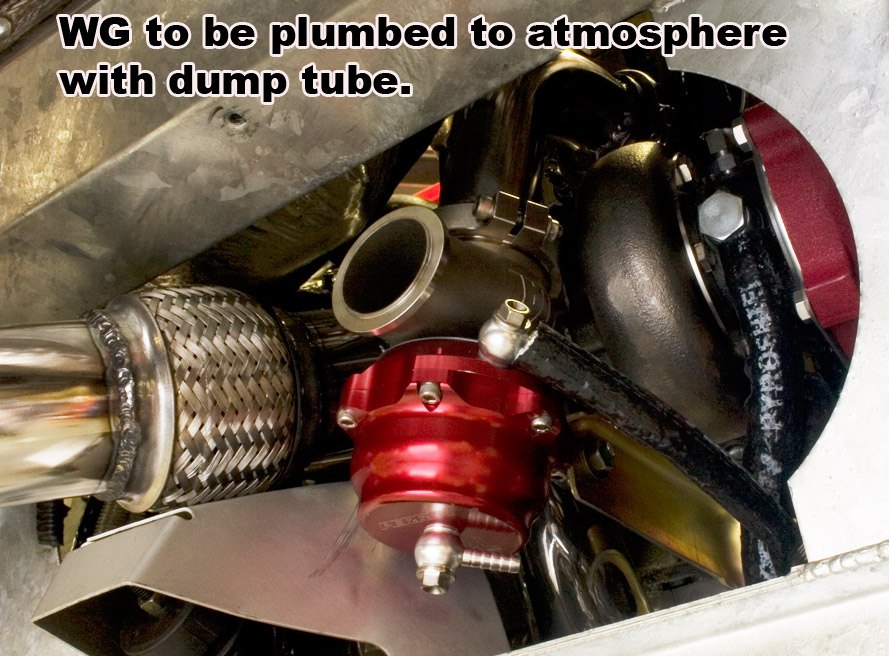
With the Exhaust system short, free flowing, and polished up, it was time to think about the External Wastegate, and how it would fit into the equation. Like other parts of the build I wanted it to look good, and be functional. Why not put it behind the turbo at the back of the car where it might be seen. Plumbing the WG dump tube back into the exhaust was something I really wanted to do, but upon inspection, things were just too tight. It had to be plumbed into the exhaust before the flex joint, and there was just not enough room to do that. So I vented it to the atmosphere. Normally I would shy away from this as it can be very loud, but who knows, running 5-10psi of boost may not make much noise anyway. Using the hole in the rear diffuser where the OEM tips came out sound like a good idea.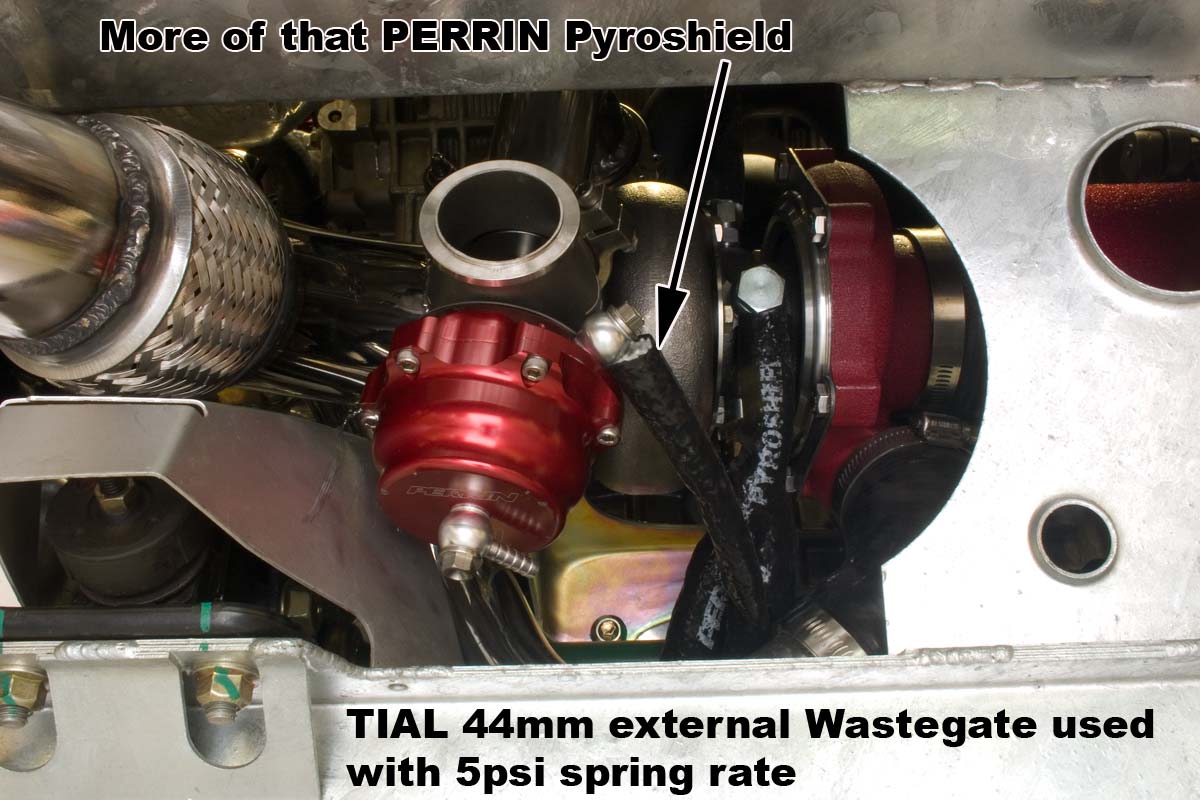
Now that the turbo is setup to breathe, its time to build boost tubes, and the intake system. Starting at the turbo, the intake was first. This was pretty simple, a PERRIN air filter stuck to the turbo inlet, done. Yes this isn't normally the best place to put an intake, but on the lotus engine, there is no extreme heat it would be seeing. The block is right in front of it, but also is the suspension and lots of ambient air flow. Routing the boost tubes to the intercooler is going to be tight, but doable. Before I get that far i have to design the intercooler, and decide where it can go.
The first thought was to use one of the side scoops for the fresh air to it. Looking at many of the other turbo kits out there they too use these scoops. The only problem is none of the are very large, and none of them are in a very good place. They also have to use helper fans to make up for their small size or poorly mounted location. There is no way that helper fans are going on my car!
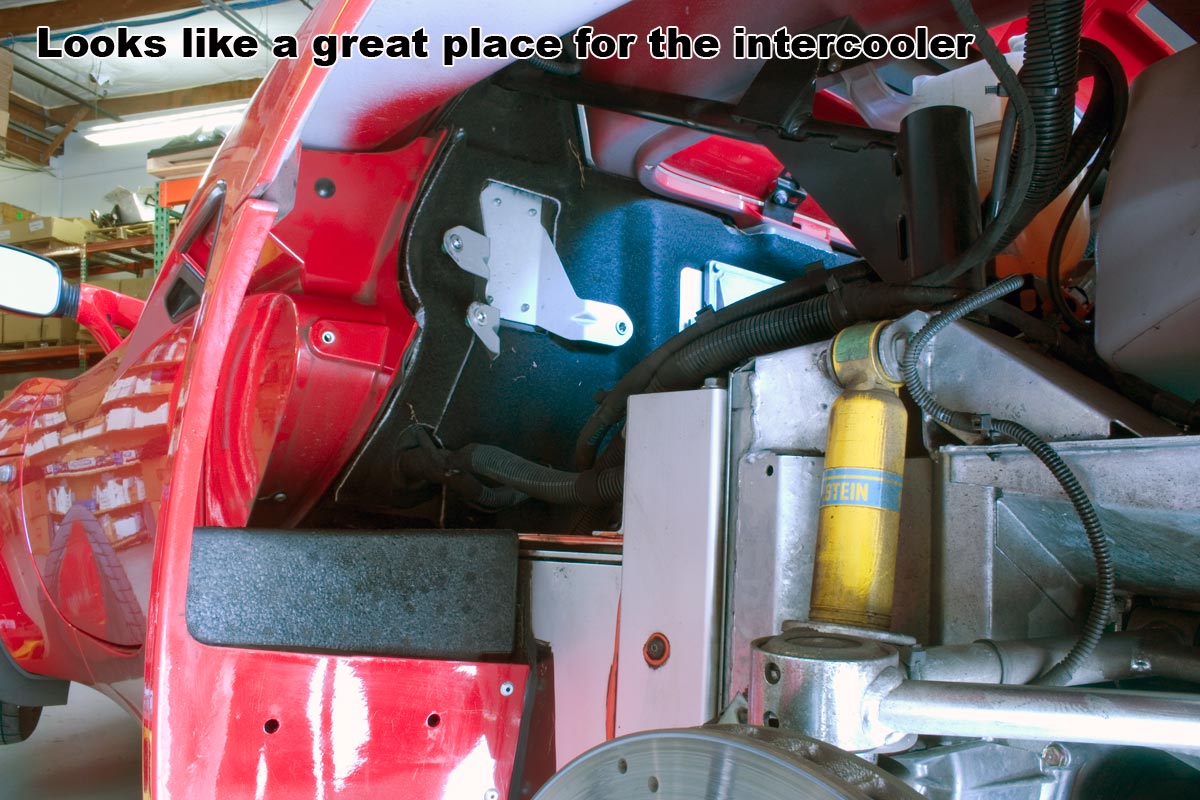
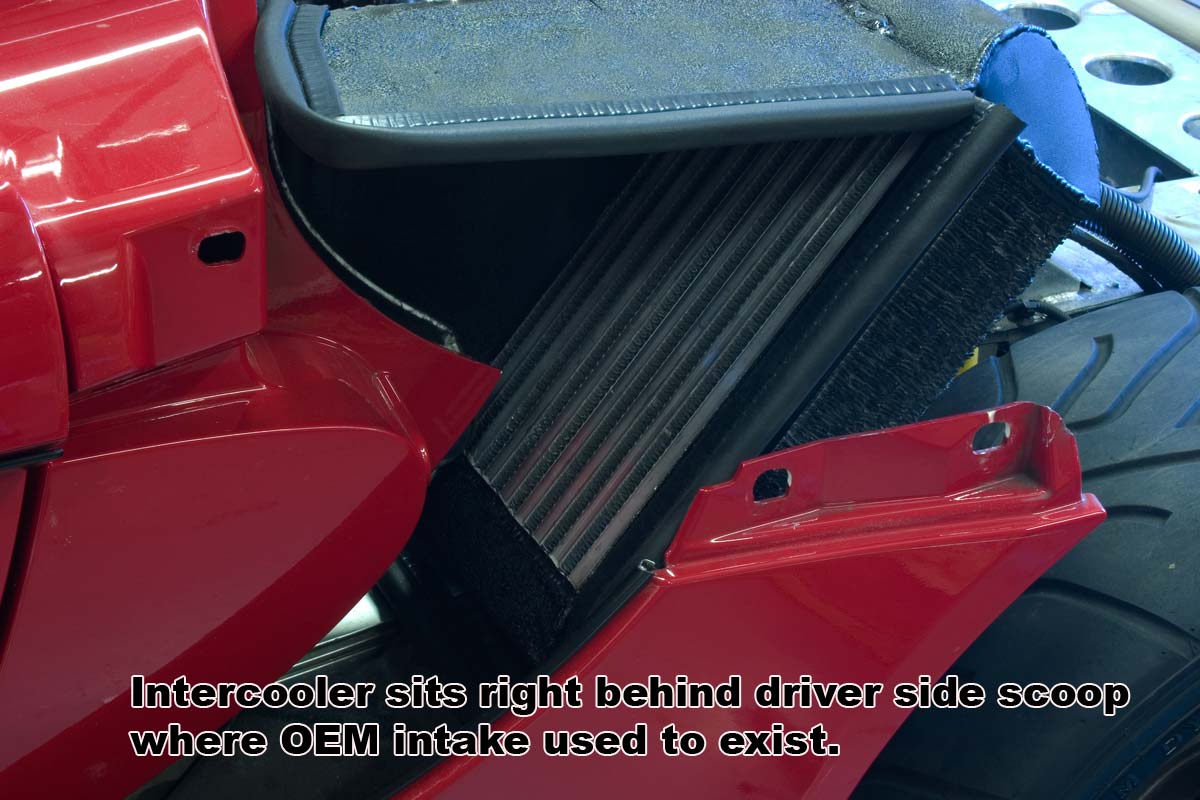
I used the drivers side scoop and started to lay out where the IC can fit. I ended up using part of a Legacy GT intercooler we had sitting around. Using what little space there is in the scoop area, I ended up basically resting the IC on the fender liner.
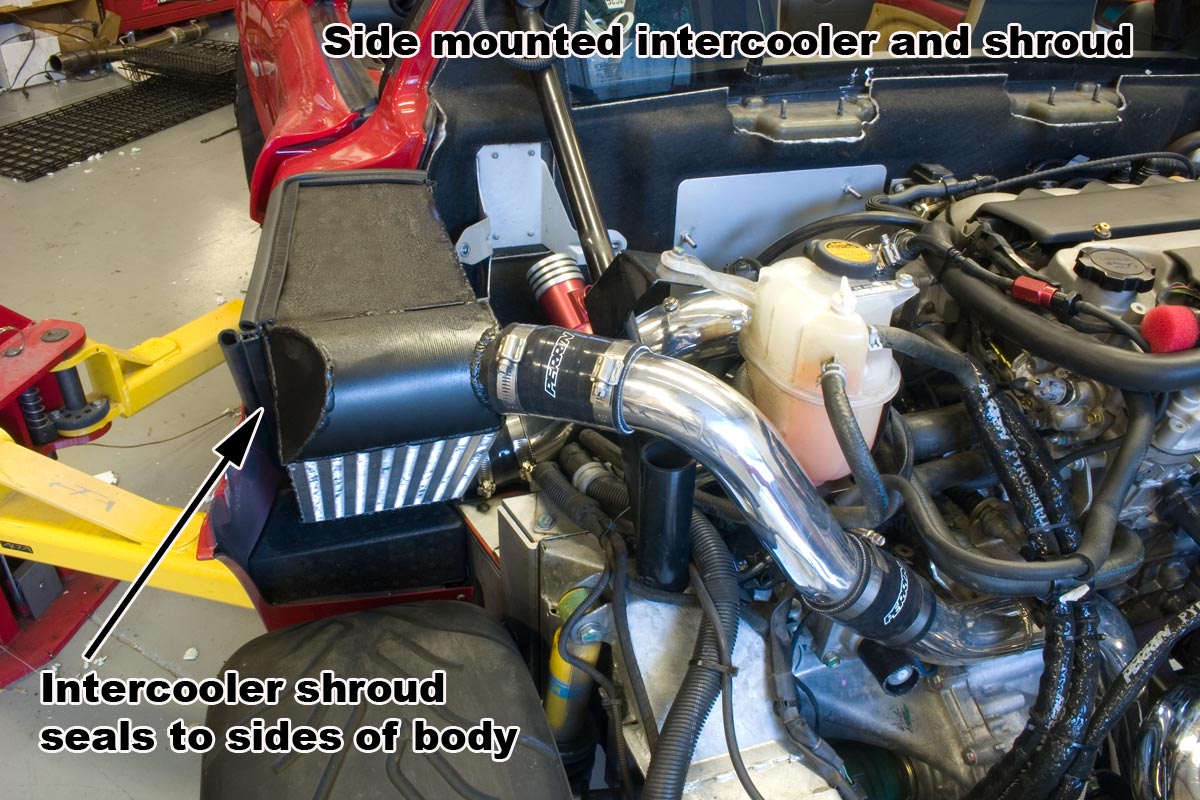
Now that the core has a nice place to sit, time for end tanks. I started with some 4" tubing and cut it in half to create the end tanks. From there, I cut some caps out for the end and welded an inlet tube and an outlet tube. To ensure it got good ambient flow from the scoop, I built a shroud around the intercooler to direct the air through the core. Other intercooler setups I have seen just let the ambient air flow around it. This is not good.
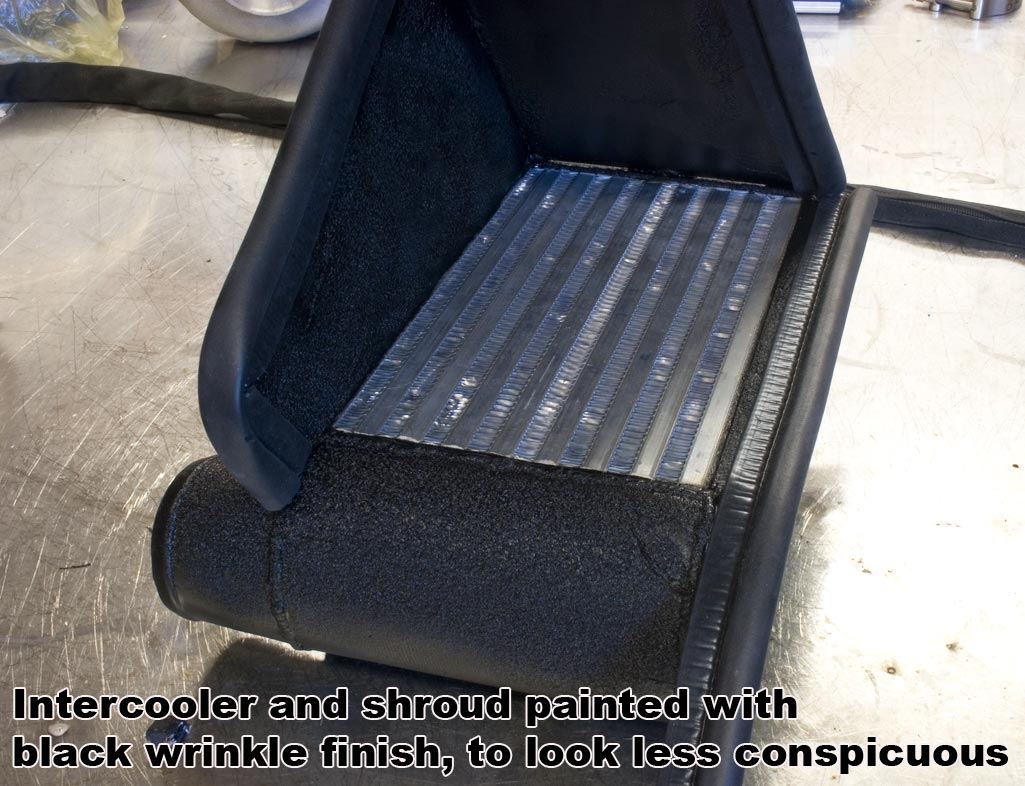
With the shroud all welded to it, I wanted the intercooler to look like it was supposed to be there, so like other parts, I painted it. This time I used the black wrinkle finish. As you can see from the pics, it looks OEM.
With the intercooler in place, building the boost tubes was easy. With a few bends here and there, a MAF sensor, flange, some time on the polishing wheel, and now then engine can finally get some boost.
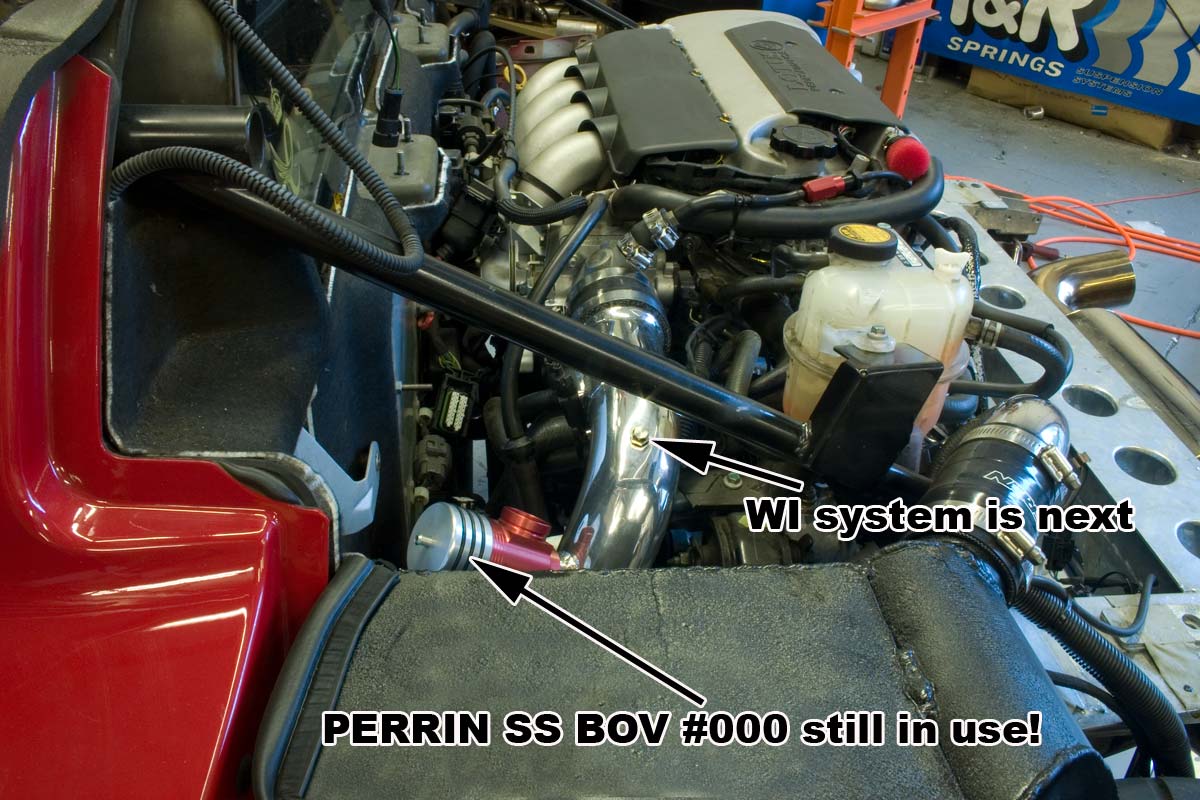
I can't forget the blow off valve! This was an easy choice, I used my trusty PERRIN signature series BOV #000. Its been used on my last 3 cars, and still working great! Instead of the normal silicone coupler and a couple of hose clamps, I used one of our universal adapters, and welded it to the boost tube. This allowed me to screw the BOV to the boost tube.
With the main parts installed and nearly ready to fire, it was time to give the turbo its vitals, oil and coolant. Getting coolant was easy, I just used the coolant input on the overflow tank, and ran it to the turbo, and back to the tank. This provided great flow, and reasonably cool temps for the turbo. The oil feed was a little tricky. No one really shows a good picture online of how they hook up. The backup plan was to unscrew the oil pressure sender and tee into that. Upon further inspection, my car has the dual oil coolers and a nice sandwich plate. Bingo, perfect fitting at the 12 O'clock position! The sandwich plate has a bleed fitting to help get oil out of oil coolers during an oil change. I just used some -3 SS Teflon hose, and some speed fittings. These allowed me to custom make the hose in the shop and not have to go down to a hydraulic fitting store.
Once the turbo gets oil it has to get rid of it. Again the simple solution is tapping into the oil pan. Once removed, I welded a small SS tube into the side, and reinstalled it. Now that makes it sound easy, but I spent about an 2 hours on this part alone. 5 minutes to weld cut the drain, and rest of the time getting the dump pan off! The OEM use of RTV is nuts! I am not even sure why there are bolts holding it on!
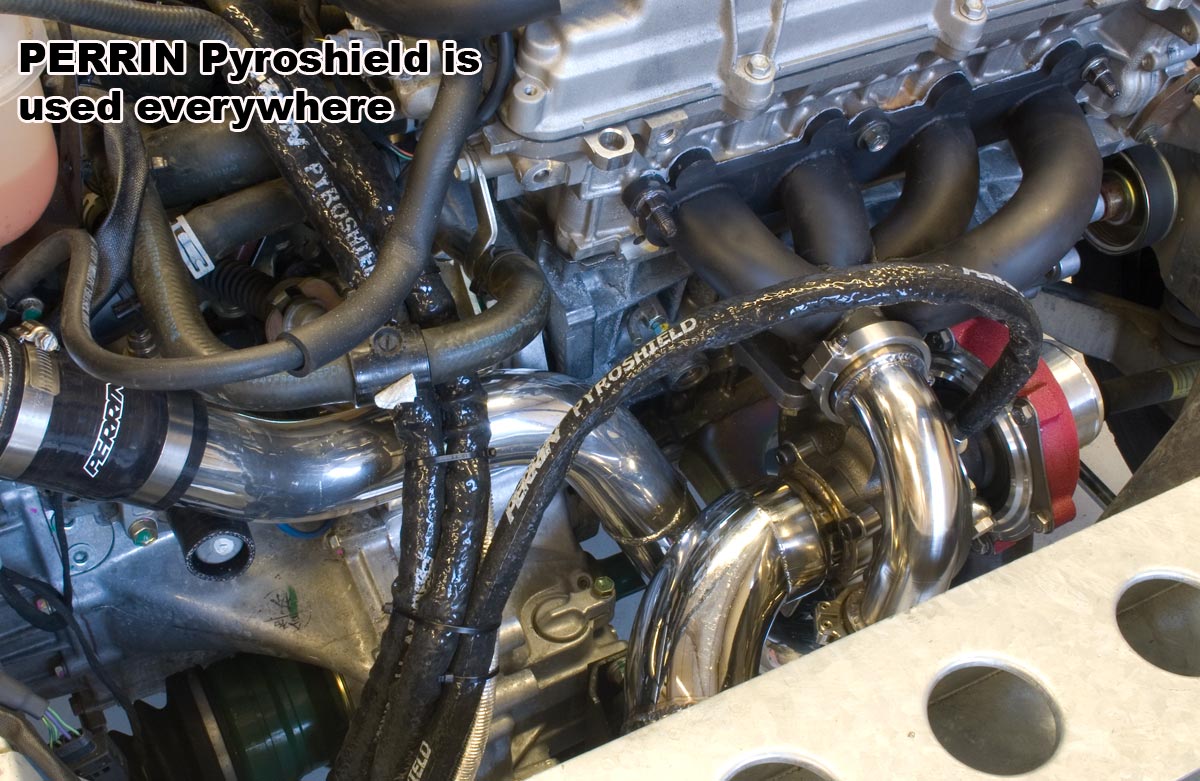
To ensure all the oil and coolant lines never had a problem with melting, I used quite a bit of our PERRIN Pyroshield to cover everything. This cover is good to 2000 degrees, and keeps the internal hose under its melting point. This ensures that there will be no issues with hoses melting or blowing off.

INJECTORS
Because I like to build things myself and not buy other peoples parts, i wasn't sure what I wanted to do about the injectors. I could buy some, or I could try modding them. We learned this little trick with the Subaru injectors, where you can remove the small screen on the end of the injector and get them to flow more fuel. The problem is we have never done this with the Toyota injectors, so how much will they flow???? First off they are a Denso part just like the 2002-2005 WRX injectors. In theory, if they use the same basic injector, and just change the screen to flow different rate, these should flow about 800cc/min. So after carefully modding them, sure enough they have the same ID where the pistons lifts from, and they have the same lift! PERFECT, I don't have to go buy injectors that may not fit or may not plug into the injectors.
Along with the injectors, i got a set of Brisk Spark plugs. While most people have never heard of them, they make a really nice part. The set i used are the silver racing eletrode plugs. These are a better plug than the iridium for power, but not quite as long wearing. But who needs plugs that last 100K miles! This item is something you will see us selling very soon!
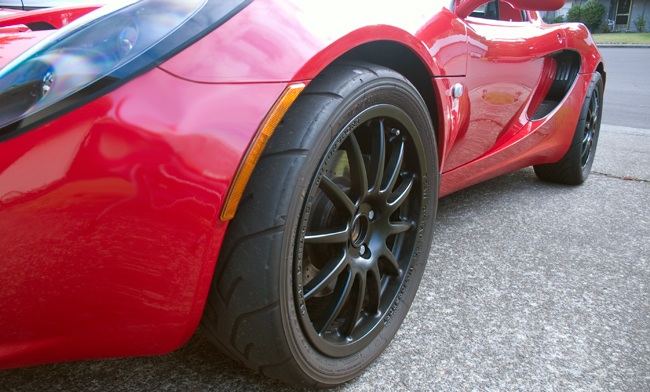
TIRES and WHEELS
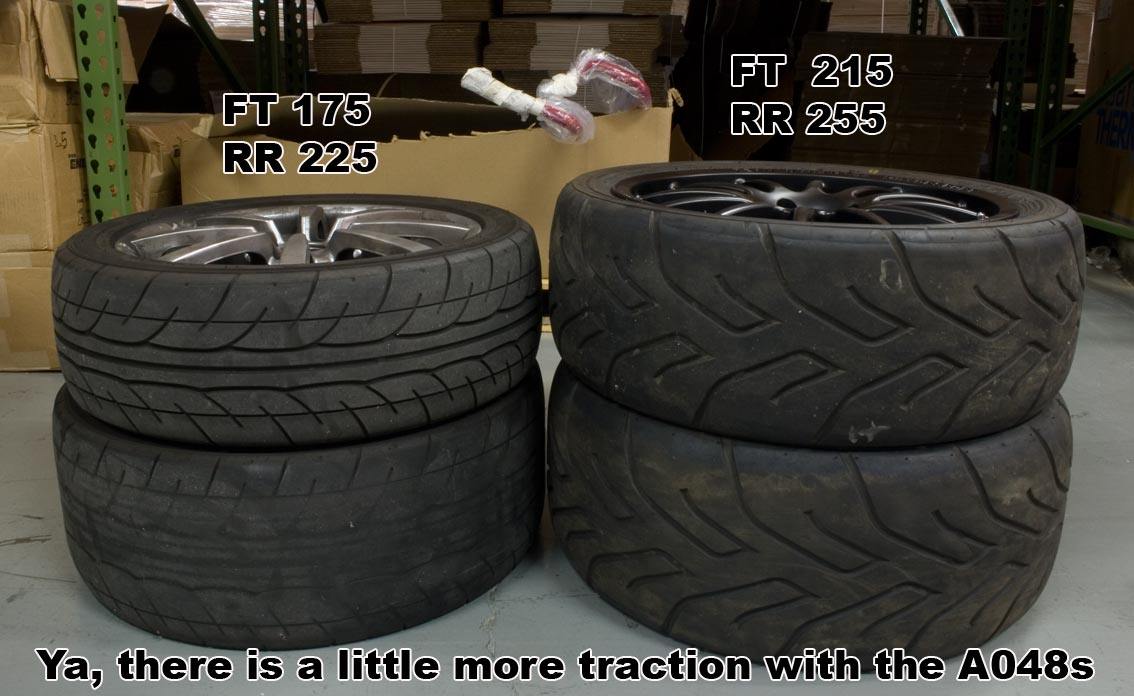
Well after a year of driving and a year of somewhat hard driving the rear tires are toast! Stock the tires are 175 fronts, and 225 rears. While this is a small light car, and those sizes will suffice...... who want to suffice!! Again back to the forums for some insight as to what can fit. 195s on the front and 235s on the back are common upgraded widths, but can that be pushed??? So 215s on the front and 255's on the back were just going to work! Now to pick the tires! The ultimate street tires in my mind are the Yoko A048s. But they are expensive, and don't last long, but grip like crazy when warmed up. John Lietl over heard me thinking of new wheels and tires and said, "hey, you help me build my Evo turbo kit, then I'll give you my A048's". I had to ask to make sure he hadn't gone out for beer at lunch but sure enough, he had a set at home, and an EVO turbo kit was on the PERRIN-Evo-parts-to-build-soon list. We have a deal!
Wheels while easy to pick out, are very hard to find the right offset. Custom ones can be made, but in the end there were 2 pretty good choices I found that fit. The Team dynamics pro race, and the PIAA FR-7, look great come in the right sizes. I went with the TEAM Dynamics wheels as their price, and availability was perfect! Semi gloss black 17x7's and 17x8's replaced the 16x6 front, and the 17x8 rear. I think the biggest change is in the front wheels and tires. The OEM fronts look like front wheels from a street bike compared to the new ones! This side by side comparison shows the change in contact patch.
After many clamshell installs, and test fittings, cutting, trimming, welding, trimming again, and polishing, it was all done, time to fire it up! Since I had no map for the injectors, I had to build it. The Hydra has a really nice injector change trim feature which allows you to enter the stock inejectors, and the upgraded injectors, and it recreates the base map for you. I tried this out and removed some timing, just to be safe. I hit the start button, and it fired right up the first time and ran great! AFR's were in check and it was time to let it do a few heat cycles to ensure coolant hoses and oil lines were all good. No leaks!!
TEST DRIVE!!
The nice thing with high compression engines and turbo kits, is that they don't loose power anywhere compared to the stock engine. Sure enough the car finally has some low end power! With 5psi of boost, and some initial tuning, I was well on my way to getting the car tuned to 10psi!
Next to come is a Prototype PERRIN PWI-2 Water injection system, and dyno results!
Shout outs:
Garrett
Hydra EMS
Team dynamics
TiAL
Yokohama
Elisetalk forums
My Tig Torch
My wife
oh, ya PERRIN Performance!
Test and Tune Session.....Finally
I finally got around to putting up the dyno plots from the tuning session. While i had been doing alot of road tuning before the dyno session, there was quite a bit of power left on tap. This is why a dyno tune is important. AFR Targets and watching for knock only get you so far. Having a great tool like the dyno shows where a specific AFR at a specific RPM makes more power. It also shows where different cam advance numbers make more power, which is not something you can see with datalogging. While dyno tuning is not something that anyone can just go get done, on any turbo setup, i think it is very important to do.
So i know there are a lot of guys with Turbo, and SC packages, but it seems lately the buzz is all about Superchargers. I am a big turbo fan, and i think that turbo is the way to go. With a turbo setup, you get more boost down low, so more torque, and you don't get the HP losses from the SC. Overall a Turbo is more complicated to install, more parts and more expensive, but it is well worth difference!
Full Write Up on the car is located HERE
After a few weeks of road tuning(driving back and forth to work) i still hadn't been able to determine where to turn the lift on. I started at 5800 which is where alot of the tuned ECUs put it. This seemed ok, but not real smooth when it kicks on. I am sure many of you are thinking, did you tune it during the changes? Yes! Of course. When tuning a car, you can just change one thing and expect results. There are many things to tune on the car to ensure that the changes you make are not waste. I spent quite a bit of time tuning the car at 5800 RPM point of lift engagement. 3 things occured. No matter what i did, a loss in power, and a rich condition. Lastly the boost dropped quite a bit. After leaning out this transition, adding timing, and even some cam timing changes, it never felt as good as stock.
For this setup, i am using the Hydra EMS plug and play ECU. This is a great tool for tuning cars, as the changes are instant, no flashing, its as simple as reading the maps, and the wide band, and making changes. Also it has great knock sensing capabilities, and feedback, so you can see where the engine is starting to get noisy.
Then i did some reaseach about the SC cars, and found that they turn the lift point on at 4500. So i did the same thing, testing this cam change over point, resulted in major low end power loss. Same thing, lots of fuel, timing, and cam timing changes, and it never was that good. So with that said it was time for the dyno.

These are the first runs with the lift at 4500. As you can see, just like i felt on the road, a large loss in power. Not to mention the huge drop in boost when it kicks on. The strange thing is, the Blow off valve actually blows off a little when this happens! I experienced this same thing when tuning another project car of mine, the Subaru H6 project. The H6 Subaru engine would drop about 3psi when the lift kicked on (when turned on below 4000) and it caused a 100HP and 100ft-lbs loss in power! Only the lift was turned on before 4500, it was fine. Same thing here.
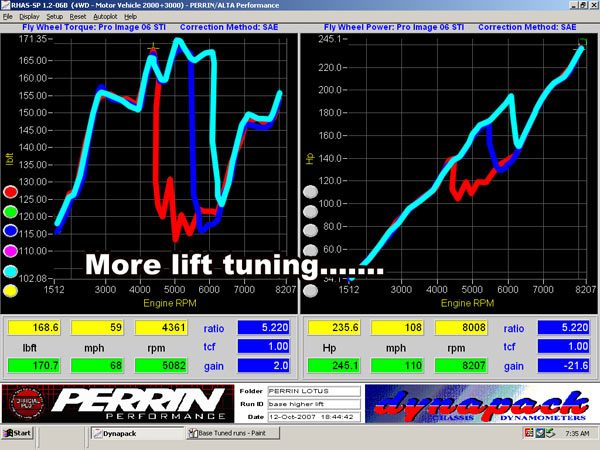
After experimenting with the lift at a lower boost setting, the graphs finally started to smooth out. The Dyno we use is a Dynapack, and is very sensitive, which is why the "jitters" show up on this. We can see a 1 degree of timing change on this dyno, so its great for R&D, but not the best for producing Dynograph to brag from. It was time to turn up the boost.
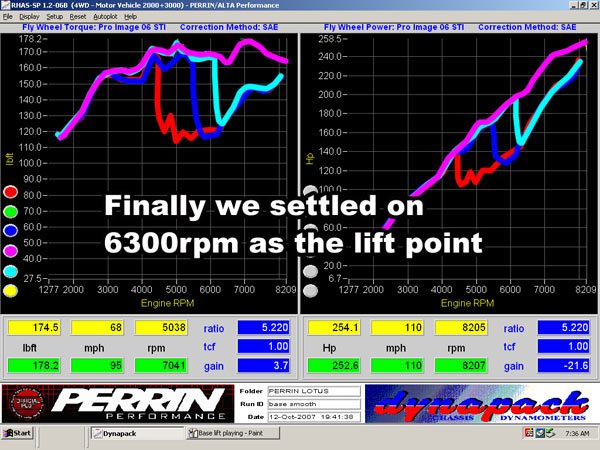
So why didn't the 4500 lift point work? Well on the SC cars, the SC is flowing a linear amount of air through the RPM range. So when the lift kicks on the SC doens't loose boost from different engine air flow from the differnet cam profiles. So the transition is much better. Some of the reallly big turbo kit guys in the celica forums turn the boost on lower, but they also are using huge turbos that dont build boost until after that point. Anyway, that is my guess.
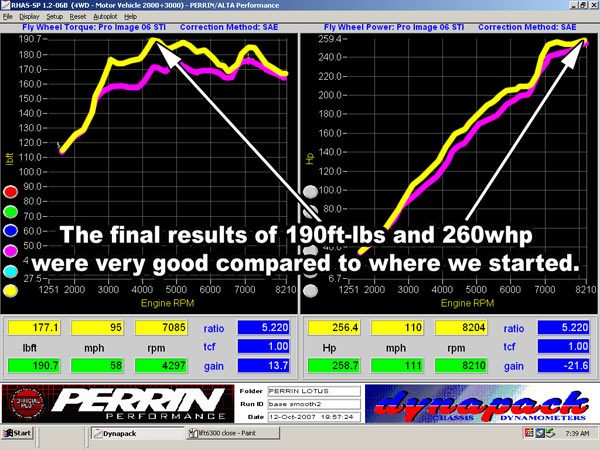
So after all that, i ended up with the power i was looking for 260WHP! The torque i didn't really have a goal. I knew i wasn't gonig to run too much more boost than 8psi, so the torque would be kind of limited. Still 190 ft-lbs, that is plenty to move this 2000 lbs car!

You can see the boost curve i started with and ended with. The more boost we ran the more the lift caused a drop in boost in boost. You can see how the high cam effects boost. The lower valve overlap at lower RPMS helps keep boost in the engine. The high overlap shows how when the lift kicks on that boost is getting blown out the exhaust.
So after all that, what you see is what i got!
The one thing that i wish i had done previous to building the turbo kit was do a baseline of the bone stock car. This just didnt happen, so all i can do is guess at the Wheel HP i had previously. Best guess i somewhere in the 160-170WHP range and somewhere around 110-120ft-lbs.
So i think most people want an Extra 100HP from there Elise, which gets it close to the HP per pound ratio of Vettes and Ferrari's. This is using CALCULATED WHEEL HP versus pounds.
PERRIN Turbo Lotus 7.6 pounds per WHP
C6 Vette 8.8 pounds per WHP
997TT 7.7 pounds per WHP
ZO6 Vette 6.5 pounds per WHP
Just something to think about when comparing this to other super cars.
After all this buildup, and dyno tuning, its time to sell the car. Not sure of a price, but i am thinking somewhere around $40,000. Seems fair?? Not sure, but i have had the car 2 years, and its time for something new!
I would be happy to share anything about the build, or anything about the tuning of car. We never made any parts for the Elise, so i am not here to compete with anyone, just sharing fun info!